This month, I have stash busted the following:
-Several sheets of newspaper to make starter pots for my garden
-A handful of t-shirts to make one rag rug, and a blanket to make a second
-Fabric to make a My Little Pony tote with a matching crochet hook holder, and a hot pink tote
-Half a pair of jeans to make a door snake
-A few ads from a magazine to make envelopes
-A juice bottle to make a clothes pin holder
-Candle scraps and broken/used birthday candles to make new candles
-A ton of baby clothes: for the door snake, and the third rag rug, which is half done
So how did I do, compared with the goals I made at the beginning of the month?
I did not buy a single new craft item! I didn't buy anything but groceries and my Sunday chai. I finished two rag rugs, and two bags! Double the original pledges. I will take the month as a success.
Next year, though, I will do better. I'm sure I can have a better list than what is up now.
Monday, April 30, 2012
Wednesday, April 25, 2012
My first knitted shawl
It is done! My first big knitting project is done! The pattern I used is In the Pink by IzzyKnits. It is definitely an intricate piece, but it isn't hard. I had to put the project down a few times while waiting for my brain to catch up with the pattern, but that was usually when I was trying to knit after I should have been sleeping.

This project brought a lot of firsts:
-I'd never made a knit shawl before
-I'd never done lace before at all
-I hadn't used lace weight yarn before
-I had to learn a circular cast on, how to bind off purl stitches, how to do a knitted cast on, p2tog tbl...


This project brought a lot of firsts:
-I'd never made a knit shawl before
-I'd never done lace before at all
-I hadn't used lace weight yarn before
-I had to learn a circular cast on, how to bind off purl stitches, how to do a knitted cast on, p2tog tbl...

Now comes the hardest part... Giving the shawl up! After working on it for 3 months, I am getting ready to send this shawl away. I made it as part of a swap on ravelry, and I am hoping to send the package out sometime next week. The one thing that makes it easier to give this shawl up is that I will be receiving a gorgeous shawl in return. I can't wait to show what comes for me in return!

Sunday, April 22, 2012
Hot Pink Tote
 A purse I had cut out to make for a friend, but hadn't worked on. I grabbed it down, brought out my sewing machine, and finished the bag. This bag is made completely from materials I had in my stash.
Also, the outside fabric is my favorite fabric EVER. My high school art teacher let me take the whole bolt of the fabric (about 3 yards) from the classroom stash. I used it to make the first purse I ever made, which is now hanging in a shadow box in my room because my favorite band my senior year of high school signed it and wrote "Happy Birthday" on it. (Thank you, Pooks, for taking the purse with you to the band's meet and greet and telling them my birthday was the following week.)
Finished measurements:
opening - 15" across
bottom - 13" across
10" deep
3" wide

Features of the purse:
-Two straps
Clockwise from top right:
-Interior zippered pocket, 8"x4" (I used a zipper from a baby hoodie I cut up to make the shag rag rug); closed
-opened
-Interior cell phone pocket, 4"x3"
-Divider that is half the height of the purse


Saturday, April 21, 2012
Old Candles to New
 I just lit my last non-holiday candle, so I think I need some more. I almost put them on the weekly shopping list, because I am out of wick to make new ones. Then I opened the junk drawer to find a pen and saw some broken/used birthday candles. Ta-da, problem solved.
Tools:
 Knife and cutting board
Pot and stove
Bowl (to melt wax in)
Pot holder
Glass container to pour wax in (or a candle mold)
Materials:
broken/used birthday candles
candle remnants
 To Do:
1. Fill the bottom of your pot with about an inch of water. Put the water on to boil.
If using cups that previously had candles, continue. If using new containers, skip to step 3.
2. Place the cups in the water. Wait for the wax to melt. Fish out any old wicks. Pull the cups out of the water and set aside to cool slightly.
 3. Using the knife and the cutting board, carefully cut/shave the wax into small chunks. Place the chunks in your melting container. Put the melting container in the pot. Leave until the wax has melted. Pull the container out of the water and set aside about 5 minutes to cool slightly.
 4. If necessary, pour a small amount of wax into the bottom of the cup. Once the wax has cooled slightly, place the birthday candle in the center of the cup. Hold the candle in place for about 20 seconds, or until the top layer of wax has solidified.
 5. Pour the slightly cooled wax to fill the cup to the top of the candle (do not cover the wick completely). If you didn't melt enough wax, you can drop in chunks of wax, or melt more.
6. Set aside to cool completely. I like to put mine in the freezer.
If you can get a steady source of candle castoffs, you can make all of your candles for a fraction of the price you would buy them for. Thanks, mom, for saving me all your scraps!

Sunday, April 15, 2012
SBP - April 2012 update
There is a new blanket up this month over at the Schuyler Blanket Project, and three other blankets that could still use squares. This is a wonderful way to stash bust yarn.
For Marc:
Marc was a graduate student in music at the University of Tennessee. He was 24 when he died unexpectedly. His graduate advisor, Connie has requested a blanket in his memory. She would like to present the blanket to his parents at a reunion they hold every year in Marc’s honor. The reunion is over Memorial Day weekend. We realize the turn around for this one is fast. We understand that it may not be possible, but we would like to try and get this one done in time for that reunion. We’re collecting 36 8x8” squares. Connie has requested squares that represent some of the things that Marc loved:
Orange, UT’s color. Garnet and Black, the color’s of the University of South Carolina where Marc received his undergraduate degree. Gold, the color of the saxophone, Marc’s instrument. Blue, because of Marc’s love of the water and boating.
Madison’s blanket still needs 15 squares.
Madison and her twin brother were born prematurely, at 24 weeks and 2 days on 7/22/2011. Madison passed on 7/25/2011. Her brother Michael was in the NICU at Children’s Memorial Hospital in Chicago. (Michael came home January 25, 2012 and is doing great.) Squares should be 8x8” in soft, washable fibers. There are no color preferences for this blanket, so feel free to be creative.
Madison and her twin brother were born prematurely, at 24 weeks and 2 days on 7/22/2011. Madison passed on 7/25/2011. Her brother Michael was in the NICU at Children’s Memorial Hospital in Chicago. (Michael came home January 25, 2012 and is doing great.) Squares should be 8x8” in soft, washable fibers. There are no color preferences for this blanket, so feel free to be creative.
Megan’s blanket still needs 12 squares
Megan had a stillbirth at 23 weeks. She had just gotten married the week before they found out their son, Charlie, no longer had a heartbeat. Squares should be 8x8” in soft, washable fibers in boy colors.
Megan had a stillbirth at 23 weeks. She had just gotten married the week before they found out their son, Charlie, no longer had a heartbeat. Squares should be 8x8” in soft, washable fibers in boy colors.
The blanket for Ilene and Omar still needs 17 squares.
Nabil died a few months ago, and leaving behind his only son, and his mom. Nabil was Ilene’s only son as well, and he lived with her. He did his best to help his mom because she was helping him too. The thought is that when Ilene passes away, Nabil’s blanket could be given to his son Omar. Nabil was an avid NY Yankees & Jacksonville Jaguars fan. It would mean a lot if those colors were included (blue/white, teal/black/gold) in the squares. Soft, washable yarn please, 8X8”.
Nabil died a few months ago, and leaving behind his only son, and his mom. Nabil was Ilene’s only son as well, and he lived with her. He did his best to help his mom because she was helping him too. The thought is that when Ilene passes away, Nabil’s blanket could be given to his son Omar. Nabil was an avid NY Yankees & Jacksonville Jaguars fan. It would mean a lot if those colors were included (blue/white, teal/black/gold) in the squares. Soft, washable yarn please, 8X8”.
I have made squares for all the blankets except the newest one, and I will be stash busting those out this week. If you are interested in donating a square (or more), or have any questions, please contact Heather@schuylersblankets.org
Friday, April 13, 2012
A pictural tour of my last few days
Never fear, I have been making awesome stuff the past few days. I just haven't gotten around to blogging about it. Until now, of course.
First up, a swiffer cover. I FINALLY used up the last of my disposables last week (because it would be silly to just throw them away, or something...). I made a swiffer cover a few months ago, and received one a few days later, so I had two. Ideally, that would be enough: one for the kitchen, one for the entry/bathroom. Launder, then reuse. Great. Until I don't do laundry for a couple days (sometimes the babies and I make very little laundry) and the swiffer covers are still dirty when I need them. This happened, so instead of doing laundry when there wasn't enough to make a full load, I decided to stash bust. You might remember that I mentioned buying a bunch of cotton yarn in my first entry. I grabbed a ball and improvised the cover below. it is made with alternating rows of hdc, sc tbl. Gabriel thought it was so cool that he did the swiffering for me.


Then I made a crochet hook holder for one of my awesome blog readers, to go with the My Little Pony tote.


Then there was middle of the week grocery shopping, and I picked up some clothes pins for the lines I have in my backyard (even though I am not supposed to dry clothes outside; I think that is a silly rule). My mom gave me the clothes line and some plastic clothes pins at a baby shower I had when I was in my last trimester with Gabriel. After more than three and a half years, only one plastic clothes pin remained. (I snapped it this morning when I tried to use it to hang up a pair of jeans).Well, I needed something to hold my new bamboo clothes pins. Conveniently, Gabriel wanted some juice, which emptied the bottle.
To make the clothes pin holder, I removed the label from the bottle. Then I cut one of the sides to make a flap (cutting three sides of a rectangle, and leaving the top attached) using a box cutter. Then I stabbed two holes near the top with the box cutter. Using a tapestry needle, I threaded yarn into the holes and tied knots to secure the ends. Then I hung it on my clothes line.
So far, it works great. When I want a pin, I grab one through the flap. When I am ready to put all the clothes pins away, I unscrew the top and drop them all in. It's so easy, Gabriel figured it out all by himself.


I also decorated some envelopes using colored water and sprinkling them with my fingers. 18 of 52 envelopes decorated.

I also finished making Becka's garb. I think the dress turned out really well, especially since I didn't use any sort of pattern at all. Too bad all my hard work will be hidden under her armor :(


Now I am working on the third rag rug. Below is what it looked like last night. Today, I have covered about half of one of the rectangles. My plan is to finish one rectangle every two days. If I manage that, it will be finished before the end of the month! Expect a long blog post full of pictures when it is done!

Also, a garden update: all my pots have sprouts! Yay!

Tuesday, April 10, 2012
Decorating Envelopes: Part Two
For some reason I woke up before 7am. I lay in bed for a while, trying to tell myself sleep was good. No deal. I waited for the kids to get up. Didn't happen. So what was I to do? Make something, of course!
I have seen some pictures of envelopes made from magazine pages. So I googled envelope folding, and decided I was too lazy for all that nonsense. So here it is, my one-cut envelope how-to.
One-Cut Envelopes
Materials:
Magazine advertisements
Scrap paper (optional; to make a place for the addresses)
Glue
Tools:
Scissors
1.Cut your magazine advertisement in half hamburger style. (Yep, it is too early for me to figure out lengthwise vs. width-wise.)
2. Fold the ragged edge down, leaving an inch of the bottom layer showing.

3. Using just a small line of glue, secure the sides closed. Fold the leftover inch down to create a flap.
Note: You could be done at this point. I chose to make address labels.

4. Cut rectangles of scrap paper (just large enough to write an address on). Glue one each to the front of the envelopes.

Ta-da! The envelopes are made. I made 8 in less than 20 minutes, including gathering all the supplies.


Envelope fronts Envelope backs
12 of 52 envelopes done.
Monday, April 9, 2012
Decorating Envelopes: Part One
This is just a quick post - not even a tutorial.
My sister and I write each other letters every 1-2 weeks. She always decorates my envelopes extra fancy-dancy, and uses pretty paper sometimes... I use boring envelopes and whatever paper is convenient. I don't usually use regular loose leaf, but it has been known to happen. Today I decided that, over the next couple of days, I will make a year's supply of fancy-dancy envelopes to send my letters in, so Pooks isn't the only cool kid.
Today's work was inspired by a craft in Mark Montano's Big Ass Book of Crafts (definitely worth the $8 to get it used, or check it out from your local library). You can find the instructions in the chapter called "Yours Truly (Creative Correspondence)". All it takes is a little dish soap, some water and food coloring, a bowl and a straw to make these bubble-printed envelopes.
My April Stash Bust tie in? I pulled envelopes from bills that we pay online. (Yeah, I don't know why we still get paper statements and envelopes....)
Four envelopes down, forty-eight to go.

Sunday, April 8, 2012
Easter, and an Easter-Inspired Sewing Project
This weekend, the babies, the boyfriend and I went to the boyfriend's mom's house. Much fun was had by all: Friday we had a bonfire, Saturday we went shopping and to an amazing park, this morning we went to church, and this afternoon the kids participated in their very first Easter egg hunt! They made out like bandits.

The egg hunt was really nice, because there were only five kids involved, ages 10, 6, 3, 3, and 18mo. The two oldest weren't allowed to pick up any eggs from the ground, and the 3 year olds were steered away from the patch of ground Mara was scouring. She did pretty well - as soon as I showed her to put an egg in the basket I was holding, she got excited to put more in. At one point, she squatted down to look harder at the ground. So cute!


Onto the Crafty Portion!
DIY Door Snake
I made one of these for myself a while ago, but was inspired while going through some stained clothing to make one for my sister. (Pooks, I am giving this to you for Christmas.) Mine works really well for my front door, and her front door is much more drafty. Hope she likes it!
Materials:
An old pair of jeans
Old t-shirt(s) to cut up - I used stained baby clothes
Thread
Stuffing
Tools:
Marker - fabric friendly, if you have one
Scissors
Straight pins
Sewing machine, or a needle - I made the first door snake without the use of a sewing machine


6. Put the pant leg right sides together. Pin one short side and the long side. Sew these two sides. Remove pins.
7. Turn the door snake right side out. Stuff with stuffing. This is the step I am at with this door snake, because I plan on stuffing it with fabric scraps and old, broken clothing (like socks that have no partner).
8. Pin the last side closed. Sew. Remove pins.
9. Put in front of a door and relish the fact that cold/hot air can no longer attack you!

 Note: You could easily applique over holes in jeans to make this project.

The egg hunt was really nice, because there were only five kids involved, ages 10, 6, 3, 3, and 18mo. The two oldest weren't allowed to pick up any eggs from the ground, and the 3 year olds were steered away from the patch of ground Mara was scouring. She did pretty well - as soon as I showed her to put an egg in the basket I was holding, she got excited to put more in. At one point, she squatted down to look harder at the ground. So cute!

Top Pic: Easter baskets after church
Left Pic: Mara with her hair clip in her face
Right Pic: Mara with their combined eggs


Onto the Crafty Portion!
DIY Door Snake
I made one of these for myself a while ago, but was inspired while going through some stained clothing to make one for my sister. (Pooks, I am giving this to you for Christmas.) Mine works really well for my front door, and her front door is much more drafty. Hope she likes it!
Materials:
An old pair of jeans
Old t-shirt(s) to cut up - I used stained baby clothes
Thread
Stuffing
Tools:
Marker - fabric friendly, if you have one
Scissors
Straight pins
Sewing machine, or a needle - I made the first door snake without the use of a sewing machine
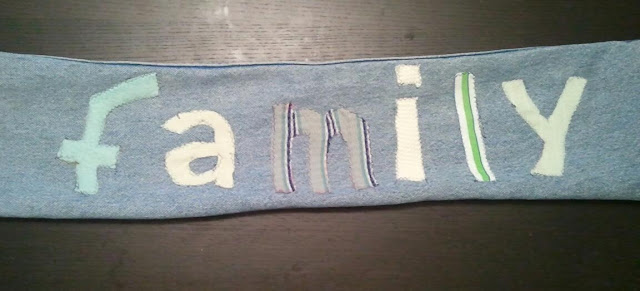
1. Figure out what word you want on your door snake, and pick out an appropriate amount of fabric. I decided on "Family", and went with yellows, greens and blues.
2. Cut a 7" wide (from the seam) strip from the pair of jeans, from ankle to waist. Make sure to cut through both layers of fabric.

3. With marker, draw your letters on the desired fabrics. Make sure to draw them backwards, so the marker doesn't show. Marker may bleed through - the highlighter did on the "m". A fabric marker is best if you have one.
4. Cut out the letters and arrange on the pant leg. Pin them down once you like the placement.
5. Sew the letters to the pant leg - through only ONE layer of the pant leg. I used a zigzag stitch for effect, and purple thread for contrast, and also because it is my sister's favorite color. Remove pins.


6. Put the pant leg right sides together. Pin one short side and the long side. Sew these two sides. Remove pins.
7. Turn the door snake right side out. Stuff with stuffing. This is the step I am at with this door snake, because I plan on stuffing it with fabric scraps and old, broken clothing (like socks that have no partner).
8. Pin the last side closed. Sew. Remove pins.
9. Put in front of a door and relish the fact that cold/hot air can no longer attack you!


Thursday, April 5, 2012
A love affair with my sewing machine
I have a new sewing machine. My girlfriend bought it for me last week (before my stash bust started) as a bribe to get me to make her a costume. It has been out of the box since that first day, but I didn't touch it until last night. I threaded a bobbin, threaded the needle, and we were off! I pulled down one of the bags I said i would finish this month, and went to work.
Gabriel and Mara were both immediately enthralled. They sat at the table watching me sew pieces, turn them right side out, fiddle with pins, and put almost the entire thing together. I did everything except attach the straps last night. I finally stepped away from the machine when I realized the kids should have been put to be half an hour before.
This morning, I woke up excited to finish the purse. I got dressed, got the kids breakfast, and sat down to pin and sew the last pieces onto the tote. 15 minutes later (maybe less...) I had a bag done! This leaves me with a problem, though... I originally cut the tote for a charity collection, along with five others, but ran out of hand-sewing steam at the sixth. So now I have a bag sitting around with no purpose. I would just use it, but... it's not quite my style. I don't want to hold on to something I'm never going to use...

The finished bag

Close up of the pattern

The lining
Wednesday, April 4, 2012
Rag Rug #2
I finished another rag rug today. This is proof that I am ridiculous, and should have just finished these rugs ages ago. I used the same methods as I mentioned for the rag rug I finished yesterday: the toothbrush method for most, and crocheting for the last few rounds. This rug has a story, but not as long as the last one.
Around the time that I got pregnant with Mara, I started a rag rug using old t-shirts. These t-shirts were beyond hope. Stained, starting to get holes, covered in paint. They were free t-shirts that friends had given me when I was in college, and I had worn many times in the scene shop. They were too icky to even wear to my overnight stocking job, so I decided to retire them. I looked around for ways to reuse old t-shirts, and came across the above tutorial. I started working on it two years ago. This morning, I picked up the rug, a crochet hook (size M), the rest of my t-shirt pieces (about half a pink, and half a blue) and a pair of scissors. Then I cut the pieces into strips, and started hooking. Gabriel made me take my work outside to enjoy the sun with him :) From picking up the materials to completing the three crochet rounds took me only a few hours, and most of that was cutting, connecting and rolling the t-shirt yarn. If I had been thinking about it, I could have saved some time by pulling out my cutting mat, ruler, and rotary cutter. Something to keep in mind for my next project.

I used a total of 4 shirts: 2 pink, 2 blue. The finished diameter measurement is 22".
Tuesday, April 3, 2012
Rag Rug #1: A how-to, of sorts
I did it! I finished one of the rag rugs! This one is for Gabriel. It is the second rag rug I started, and I finished it first because it was close to me when I decided to work on a rag rug. (It was in my desk drawer in the basement, where I was hanging out with the kids; the other two were in my bedroom, on the second floor.) This is also the only rug that has a real story behind it.


The only piece of the blanket not completely faded
Once upon a time, when my siblings and I were little, my mom gave my sister and me a blanket each. These were not just any blankets - these were Bambi Blankets that had belonged to my mom's sisters when they were little (basically when the dinosaurs were around :P). Anyway, this blanket went through a lot with me:
- I took it camping, and on sleep overs.
- It was a perfect addition to any fort.
- In high school, a friend's girlfriend once asked if she could buy it from me for $50 because her sister's name was Bambi, and her birthday was coming up. I considered, as $50 was a lot of money for a girl without a job, but couldn't part with it.
- Bambi lived on my bed in college, but made every trip home with me.
Basically, Bambi and I were inseparable. Until Gabriel was born. Then, somehow, it became his blanket. At first, this was not a big deal, since he slept in my bed from the day we came home from the hospital to the day I went back to work when he was six weeks old. And, honestly, he more or less slept in the same bed with me until he was six months old. I tried that whole crib thing, but he nursed until he was nine months old, and I was good at getting him to nurse him, but not so good at putting him back. Bambi briefly returned to my possession when he started sleeping full time in his own crib, but that was short lived. Soon Gabriel started pulling Bambi off my bed and rolling up on the floor in it.
When we moved from Michigan to Kentucky when Gabriel was 18 months old, the battle was lost forever. Bambi was officially his blanket. Unfortunately, Bambi had been through a lot. Battle wounds and aging signs were showing. The plain blue backing fabric was wearing through in places, the outer seam was coming apart, and the tacking was coming undone. I couldn't get Bambi away from Gabriel enough to keep up with the breakdown - no one plays more roughly with their blankets than toddlers. On the morning Gabriel woke up crying because he had somehow crawled through the ever-growing hole in the back fabric and couldn't get himself out, I knew it was time. I washed Bambi, folded it, and put it away until some way of preserving it hit me. A week or so later, I pulled out the first rag rug I had started. Immediate ah-ha moment: I would make Bambi into a rug for Gabriel! And so I set aside the first rag rug, and started on Gabriel's.
I used the same method for making Gabriel's as I had for the first - the toothbrush method. I followed a tutorial that is completely brilliant - it shows you everything you need to know (as far as I can tell, anyway). I decided to go with the toothbrush method because I wanted to learn a new technique. I used a blunt tapestry needle, and both the front and back fabrics of the Bambi blanket, alternating fabrics for the outside color and using only the plain blue fabric for the inner color. I made pretty good progress, but then we moved from a small apartment to our townhouse, I worked on the rug a little, and then it was put away in the bottom drawer of my desk, and there it languished for eight months. Until yesterday, when I pulled it out. I started in with my tapestry needle, but... I decided I wanted to add some interest to the last several rounds. So I switched over to a crochet hook (size K). I kept the inner strand throughout the crocheted rounds, except for the last one. I crocheted until I ran completely out of fabric. Now there is only the swatch pictured at the top of this post, and the rag rug.

Front

Back
The shape isn't perfect, but I think it turned out pretty well. And Gabriel has been laying all over it with cars and jelly beans, so I think he approves :)
Finished size: approximately 27"x21"
ETA: Mara thinks the rag rug makes an excellent blanket
Subscribe to:
Posts (Atom)